This year’s big summer project is a complete redo of the back yard. My neighborhood is hilly, and my house sits about at the level of my back neighbor’s roof. There’s a short retaining wall original to the 1950s builds, but it was insufficient. My back yard was rapidly eroding away, and taking the back privacy fence with it.
Here’s a “before”. Note the 2×4, which is about level, and how the yard… isn’t. And the fence sloping away.

And a “before” from the neighbor’s side:

Erik and I had struggled with what to do about this for a long time. When we bought the house, we knew this was the biggest issue. We’d gotten a quote for a proper rebuild of a retaining wall… $35k, and would require working from our neighbor’s back yard, which was a non-starter. We couldn’t figure out how to solve the problem working only from our uphill side, touching only our property.
Then, on Reddit one day, I saw someone asking what to do about a slope, and Dirt Lockers were mentioned. I googled, and sent a message to Erik: “Would this work?” He did his Geologist research, consulted with some engineers he worked with, and decided: Yes, it would work!
We also called our city’s Building & Safety to confirm we were good to go, and did the 811 dig hotline, of course.
We shared our plans with our neighbor, and learned she was a) against it, and b) moving. Okay. We gave that the weight it deserved (none).
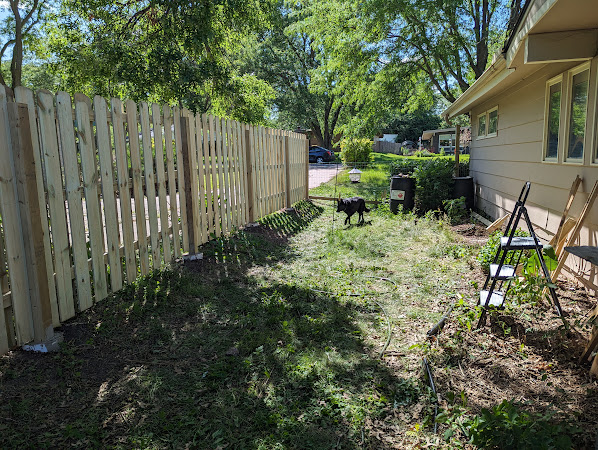
As part of the project, we also decided we were going to enclose the South side yard — what was mostly just a wasteland of weeds b/c it just wasn’t easily accessible.
Erik measured and did math, and we put together a materials order for 150 feet of shadowbox fencing:
- Qty: 8 | 10″ x 4 ft concrete tubes
- Qty: 450 | 6′ dogear pickets (5/8″x5 1/2″)
- Qty: 25 | 4″x4″x30″ Post Support Spike
- Qty: 25 | 4″x4″x8′ Green Treated Posts
- Qty: 66 | 2″x4″x8′ Green Treated Rails
- Qty: 1 | 215′ Nylon Rope, for planning
- Qty: 1 | Post and Pipe Level
- Qty: 1 | 48″ Level
- Qty: 24 | 60 Lbs Bags Concrete
- Total Cost: $2,255.40
Then thing stalled out for a bit. We kept working on the Dirt Locker plan, but felt a little insecure about how to execute. However, they have great service and offer a consult for $99, which gets refunded as part of your order. We scheduled a Zoom Call with Mike, the founder, and talked through our plans. I wish I’d taken better notes, but we got confident enough to move forward with an order. ($1,803.50 for 110 dirt lockers and … 80? I think? J-hooks)
To get our feet under us on the fence side of things and build confidence and competence, we decided to do the “easy” 50-ish foot length of the side yard over Memorial Day weekend.
Our Fence School was a youtube video by That Tech Teacher, and I cannot speak highly enough of this content. We learned so much from his process, and returned to the video multiple times over the project to refresh our memories. Sincerely, we would not have been as successful without This Guy.
To set the posts, we dug a hole approximately a foot deep. Into the bottom of the hole, Erik drove a 30″ post spike. Then we installed the 4×4, and put a concrete footing around the joining of the post spike and the post. In the pic below, you can see one finished post, and Erik driving the spike for the next post. He notes that swinging a sledge hammer is harder than you think, and the post spikes were like $20 apiece…
Lesson: Just rent an auger and dig the holes.

We installed posts, then stringers. (Though we had to make a detour to the store to upgrade my ancient drill and tiny saw to an impact driver and a saw that could cut through half a 4×4.)

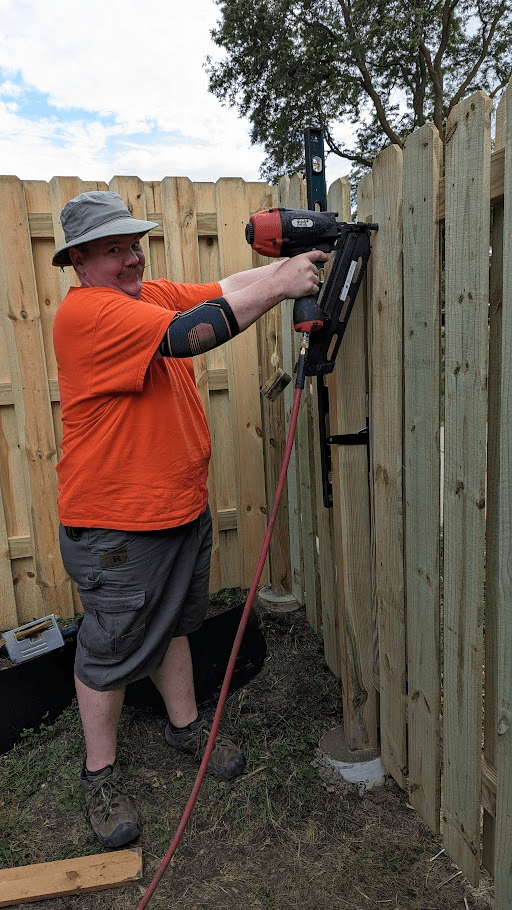
Then, we used a nail gun to apply pickets. My coworker loaned me a compressor and gun, and it worked for about 5 nails and then mysteriously stopped working. Happily one of my neighbors is a) great, and b) owns every tool known to man, and loaned Erik and I a Very Serious Nail gun I immediately dubbed “The Crucifier”. Honestly I think this turned out for the best, as the neighbor’s nail gun had nails with wider heads, so I think that bodes well for the longevity of the fence.
Lesson: Make sure your plan allows for variance, because your posts are never going to be perfectly 8 foot spans.
Based on the Youtube video, Erik put together a jig to ensure even height of the pickets:

And then I started placing inside pickets! Proof of concept passes! We built a fence!
With that win under our belts, time to move on to the hard part.
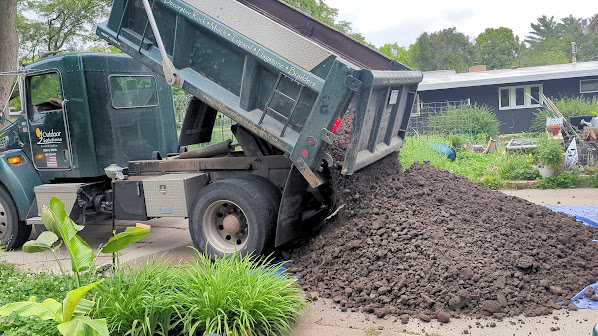
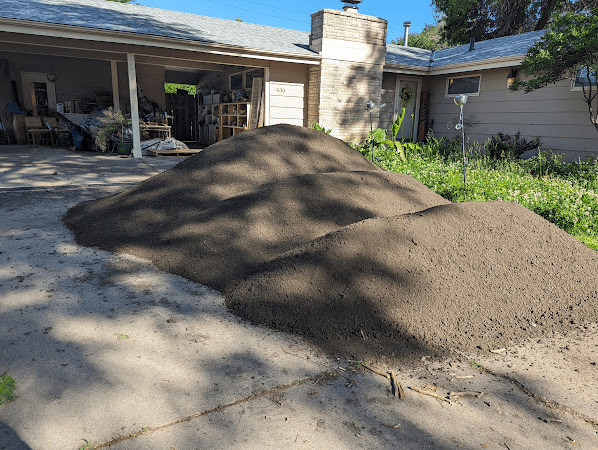
Erik calculated how much dirt we’d need, and arranged a preliminary delivery of 8 cubic yards of fill dirt for the Friday before Fence Week. Our fave landscape supply (Outdoor Solutions) has three grades: Unprocessed, Processed, and Topsoil. We opted for the middle grade.
Lesson: We should have paid for the good topsoil for the whole project.
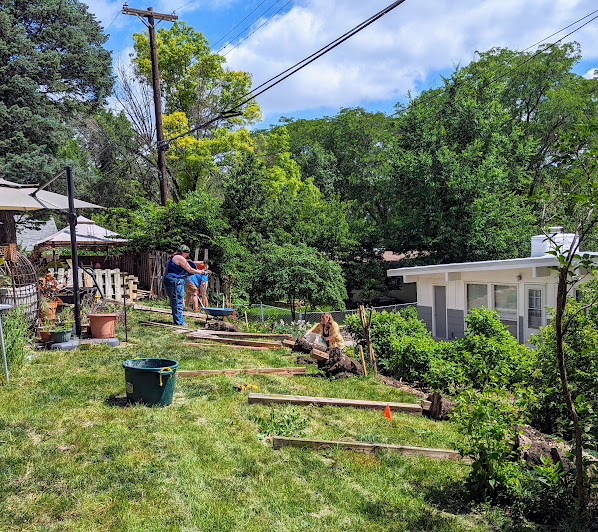
Saturday we put the call out for help, and had probably 6 friends show up: My niece and brother, a couple coworkers, a friend was visiting from out of town and her husband came to help us out… it was a heart-warming show of support. The crew tore down the old fence in about an hour, and we cleared buckets and buckets of river rock from the neighbor-side of the fence. We even got 4 out of 9 posts for the back in the ground! Our friends and family definitely set us up for success!


I got hella sunburned.
Lesson: Be sun-aware. Apply sunscreen often. Spray sunscreen works better than smear-on when you’re dirty and sweaty. Tshirts are your friends. Wear a hat.
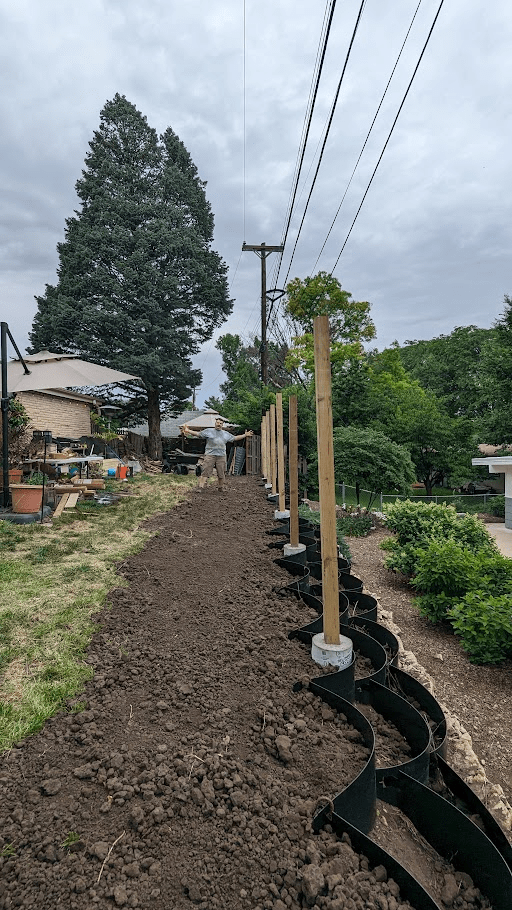
The next day, Erik worked on pouring concrete footings, and I put together the dirt lockers. Erik had drawn out a plan for 3 rows, with 35 lockers on the top row.
Lesson: The dirt lockers are a lot longer before they’re installed, so you need a lot of space. There’s also a knack to assembling them, but there are good videos on it.

Sunday was a confronting day for us. After the work frenzy of Saturday, having just the two of us on Sunday was daunting, and exhausting. Luckily, we had gatorade and homemade runzas to sustain us.
Lesson: If you’re embarking on a major labor project, pre-make some good food you can heat up and eat with minimal effort. Your body needs fuel, and everything is less frustrating with a full stomach.
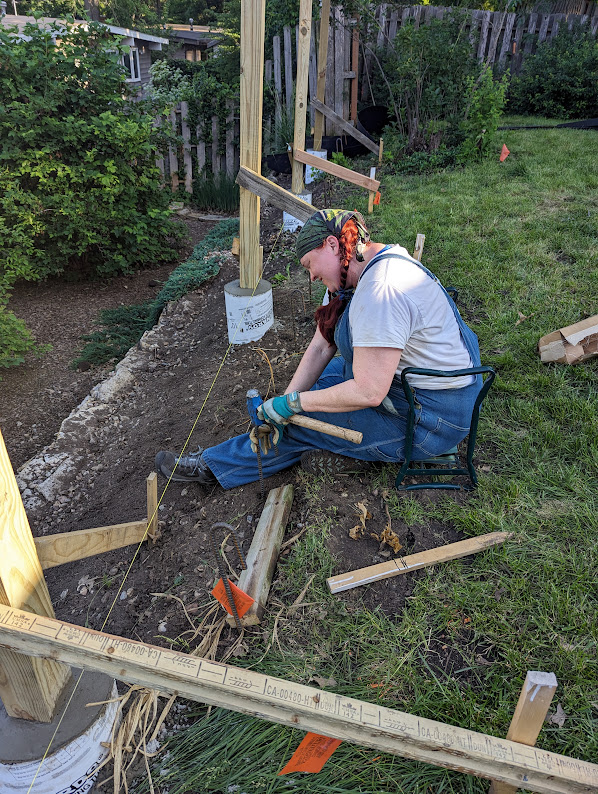
We ended the day placing the J hooks for dirt lockers, which was a stupid math problem of dirt locker distances and fence post placement.
Bonus pic of Construction Supervisor Lucky:
The next day, Monday, kicked our ass even harder than Sunday. We started to pull out the supports for the fence posts, and I did a really stupid thing and levered a 2×4 into my face. I thought I might’ve broken my nose, so we wasted a couple hours on an Emergency Room run. (Turns out I’m fine, just badly bruised.)
Back at home, we dragged the dirt lockers into place and installed them. That part — the actual dragging and initial position — was way, way easier than I expected.

But then our placement of J hooks wasn’t good, so we ended up spending hours pulling them out and redoing it. At one point, we removed probably 2 dozen dirt lockers from the assembly, and had to reassemble the “grid” in place, and I think we placed the J hooks at least three times.
Lesson: We got frustrated with the J hooks and fence posts, and ended up trying to optimize for that. We didn’t properly account for the actual dimensions of the dirt lockers.
We finally got things in place, and started trying to fill with soil. Our partially processed soil was full of chunks. It was really heavy, and it was difficult to get the dirt lockers shaped properly. (See previous lesson about soil quality.)
Lesson: Rent the equipment.
Tuesday, we got some frantic phone calls from our (former) neighbor’s realtor, as that closing had gone through and the new owner hadn’t been told about our plans, and it didn’t look great at that point, so there were some understandable questions about the final product. Later in the week we’d meet our neighbor and get on the same page, and everything is good there, now.
Then we made a trip to Home Depot to rent a mini skid steer (Dingo). This was a game-changer! We spent the rest of the day Tuesday moving the existing dirt into place.

It finally began to look like the terraced slope we planned for, and we filled in some of the eroded problems in the main yard!
Lesson: Some places, the dirt locker contour won’t match the slope exactly. Put some mulch and/or clumps of dirt in the bottoms of those lockers to hold the looser soil.
We ordered another 8 cubic yards of soil (the good shit, this time), but couldn’t get on the list until Wednesday at 5 PM, so Wednesday was a bit of a rest day, though we still did hours of manual labor. Cleaned up. Moved the pieces of the old fence somewhere for long-term storage of scrap lumber. Etc.
Thursday was Second Dirt Day! Another round with the dingo, and filled the dirt lockers (the topsoil filled them so much more easily!!) We also poured so much topsoil on the main yard, and leveled it out. It’s still got a slope to it, but not the hard cut off of the previous erosion issue.


Finally it was time to actually fence the fence. We put up rails, and started nailing pickets.

We used a narrower spacing for the back fence, for privacy. We’d initially planned on a spacing of about 3″ between pickets, and narrowed to 2″. So we are going to need to buy some more pickets before our final section of fence.
I wish I had a pic of the fence from the neighbor’s side, because Erik spent HOURS making sure the pickets were consistently spaced, on smooth lines of height change, etc. The new neighbor came out to compliment his work! But alas, we only have pics of the inside, which is fine, but not as good.

Friday evening, it started raining, so I quickly threw down some grass/clover mix, and straw, to start our new lawn.
That night we got an inch and a half of rain in like… an hour? Erik and I were both anxious about whether or not the dirt lockers held. The next morning revealed they did… ok. Several of the ones we knew were kind of extra-loose blew out, but mostly they held.

Saturday we finished up the last 10 foot length of the back fence, and filled in the front of the side yard — we’d left it unfenced to leave room for the dingo to move through.
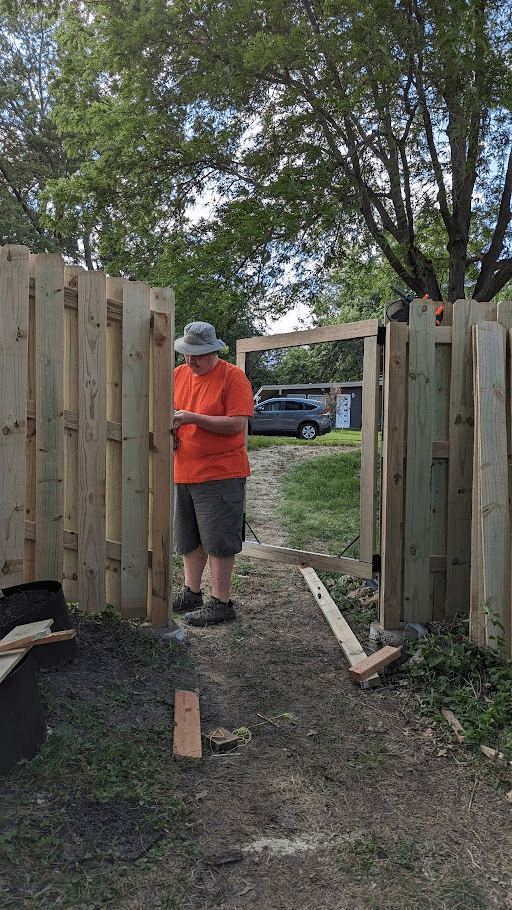
Erik built two gates: one from the side yard to the front yard, and one small one in the back fence so we can get over to the other side for any necessary maintenance.
Lesson: The Gate Kit at Menard’s sucks. Just learn to build a gate.
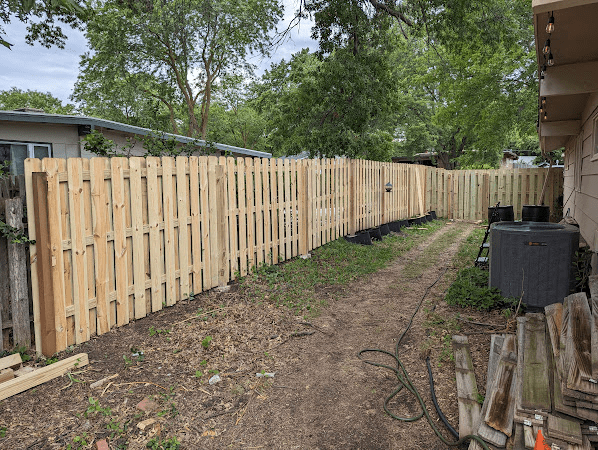
And here is Erik firing the last nail!
And thus, we have a finished back yard fence! (Mostly. There’s one section of existing fence we want to replace, but it’s fine for now.)


Final cost breakdown (excluding tools purchased over the course of the project):
Fence materials: $2,255.40
Dirt Lockers: $1,902.50
Dirt: $763.63
Dingo Rental: $1,157.90 (includes gas purchased for it)
Misc Other Materials: $283.33 (nails, stakes for planning, longer 2x4s than we planned for, gate kits…)
Grass Seed: $54.45
TOTAL: $6,417.21
Non-monetary cost: So much pain. Erik expects he’ll be wearing wrist braces for a month, between wrangling the Dingo and the nail gun. My hands and arms are sore, too.
We’d originally budgeted $5,000, so we blew that out of the water, obviously (moreso when you include the new tools, not in the breakdown above), but the main budget-buster was the Dingo, and I don’t think we could’ve succeeded without it. Overall, I think we did this project as economically as we could have, and I don’t think we could’ve afforded to hire it out, but it is also at the upper end of what we could possibly DIY.
Our neighbor is taking on the plantings in the dirt lockers, which we’re really grateful for — approximately 75 perennials would’ve been another huge expense. However, our neighbor is a gardener, and is open to the possibilities of what she can do with the space.
I’m incredibly proud of the work. I’ve never done a project on this scale, or this much manual labor over this long.
And now, to the long tail of the project! Growing grass, planting tropicals along the fence, and so on. We made a foray to a garden center today and got a banana plant, and when we returned the Dingo rental I found hardy hibiscus 3 for $10 at Home Depot, so I snatched up a half-dozen of those.
So there you have it. It’s amazing what we could do with enough planning, breaking down into small steps, and stubborn hard work!
